Apply for your National Police Clearance (NPC) online in just a few steps. Register on the official NPCS portal, book an appointment, pay the fee, and visit your nearest police station. This guide covers everything you need to know — from registration to release of your clearance certificate.
What Is a National Police Clearance?
A National Police Clearance (NPC) is an official document issued by the Philippine National Police (PNP). It confirms that a person has no criminal record anywhere in the Philippines.
This clearance is different from a Local Police Clearance. A Local Police Clearance only checks records in one city or town. The National Police Clearance checks the entire PNP database nationwide. That makes it more trusted and widely accepted.
Most employers, banks, embassies, and government agencies now require the National Police Clearance — not the local version. If you are applying for a job, a gun license, a credit card, or a travel visa, you will most likely need this document.
The good news is that applying for it is now easier than ever. The National Police Clearance System (NPCS) lets you do most of the process online — from registration to booking an appointment and paying the fee.
Why the National Police Clearance Matters in 2026
In the past, getting a police clearance meant going to a police station and waiting for hours. Records were not connected across cities. A person could have a criminal case in one place and get a “clean” clearance from another.
That changed when the PNP launched the NPCS (National Police Clearance System). Now:
- All records are stored in one central database
- Your clearance is valid nationwide, not just in one area
- Each certificate has a QR code that employers can scan to verify it
- Your fingerprints, photo, and signature are stored digitally for security
In 2026, stricter rules under the Data Privacy Act and the rollout of the PhilSys National ID have made the NPC even more important. Many institutions now reject old-style local clearances and only accept the National Police Clearance.
National Police Clearance vs Local Police Clearance vs NBI Clearance
People often confuse these three documents. Here is a simple breakdown:
| Feature | National Police Clearance (NPC) | Local Police Clearance (LPC) | NBI Clearance |
|---|---|---|---|
| Issued By | Philippine National Police (PNP) | Local Police Station | National Bureau of Investigation |
| Coverage | Nationwide | Local area only | Nationwide + International |
| Best For | Local jobs, gun license, IDs, bank requirements | Local transactions | Overseas jobs, board exams, travel abroad |
| Application Method | Online (NPCS portal) + station visit | Walk-in at local station | Online (NBI portal) + NBI center visit |
| Validity | 6 months | 6 months | 6–12 months |
| Online Verification | Yes (QR code + NPCS portal) | No | Yes |
| Fee | ₱150 + transaction fee | ₱100–₱200 (varies) | ₱130–₱170 |
Simple rule to follow:
- Working locally? → Get a National Police Clearance
- Going abroad or taking board exams? → Get an NBI Clearance
- Local barangay matters? → Get a Barangay Clearance
If you are not sure which one you need, ask your HR department or the agency requesting the document.
Who Needs a National Police Clearance?
A National Police Clearance is needed in many situations. Here are the most common ones:
For Filipino Citizens
- Applying for a new job (private company or government)
- Processing a business permit
- Applying for a passport or travel visa
- Getting a gun license (LTOPF)
- Applying for a credit card or bank loan
- Starting work abroad
- Completing government ID requirements
- Background check for legal or personal matters
For Foreign Nationals (Expats)
Foreigners who have been living in the Philippines for 6 months or more can also apply. They may need it for:
- Renewing their work permit
- Applying for or renewing a residency visa
- Employment or rental agreements
- Legal background checks
For Students
Some schools and universities require a police clearance for:
- Applying for scholarships
- Joining school exchange programs
- Applying for special activities or competitions
Who Is Eligible to Apply?
You can apply for a National Police Clearance if you meet these basic requirements:
- You are a Filipino citizen — OR — a foreign national who has lived in the Philippines for at least 6 months
- You are at least 18 years old (some local stations may allow applicants as young as 16 with a guardian)
- You have at least one valid government-issued ID
- You do not have any active warrants of arrest
Minors can also apply in special cases, such as adoption, but they must be accompanied by a parent or guardian.
Requirements for National Police Clearance
Before you start the online application, make sure you have everything ready. Here is a complete list:
Digital Requirements
- Active email address — Use Gmail or Yahoo. Avoid work emails that you might lose access to later.
- Active mobile number — Needed to receive One-Time Passwords (OTP) during registration.
Valid IDs (Bring TWO originals)
You need two valid, original government-issued IDs. Do not bring photocopies — you must show the physical cards.
Primary IDs (Most Preferred):
- Passport
- Driver’s License (LTO)
- SSS ID / UMID
- PhilSys ID (National ID)
- PRC License
- Voter’s ID
- GSIS UMID
Secondary IDs (If Primary Not Available):
- PhilHealth ID
- Postal ID
- Pag-IBIG ID
- TIN ID (must be digitized PVC, not paper)
- Senior Citizen ID
- OFW ID
- PWD ID
- School ID (with current Registration Form)
- AFP, BFP, BJMP, PCG, PNP-issued IDs
- IBP ID (for lawyers)
- Alien Certificate of Registration (for foreigners)
- Birth Certificate (certified copy, as support document)
Critical Warning About Your Name
Your registered name must exactly match your ID. Even a small difference can cause a “Data Error” at the police station, which means you will have to reapply and pay again.
- If your ID says “Ma. Theresa” — do NOT type “Maria Theresa”
- If you have a suffix like “Jr.” or “III” — include it exactly as it appears
- If your middle name is on your ID — include it during registration
National Police Clearance Fee
Here is a full breakdown of what you will pay:
| Fee Type | Amount |
|---|---|
| Clearance Fee | ₱150 |
| Transaction/Gateway Fee | ₱10 – ₱30 |
| Total Approximate Cost | ₱160 – ₱180 |
Free for First-Time Job Seekers
Under the First Time Jobseekers Assistance Act (RA 11261), first-time job seekers can get their National Police Clearance for free — one time only.
To qualify, you must:
- Be a Filipino citizen actively looking for your first job
- Get a Barangay Certificate stating that you are a first-time job seeker
- Bring that certificate when applying
Important: This free benefit applies only once. Make sure you use it for the right application.
Step-by-Step: How to Apply for National Police Clearance Online (2026)
Here is the complete, easy-to-follow process for applying online:
Step 1: Register Your NPCS Account
- Go to the official portal: http://policeclearanceinfo.ph/
- Check the URL carefully. It must end in .ph. Fake websites exist that look real but steal your personal data.
- Click the “Register” button (upper right corner of the page).
- Accept the Terms and Conditions.
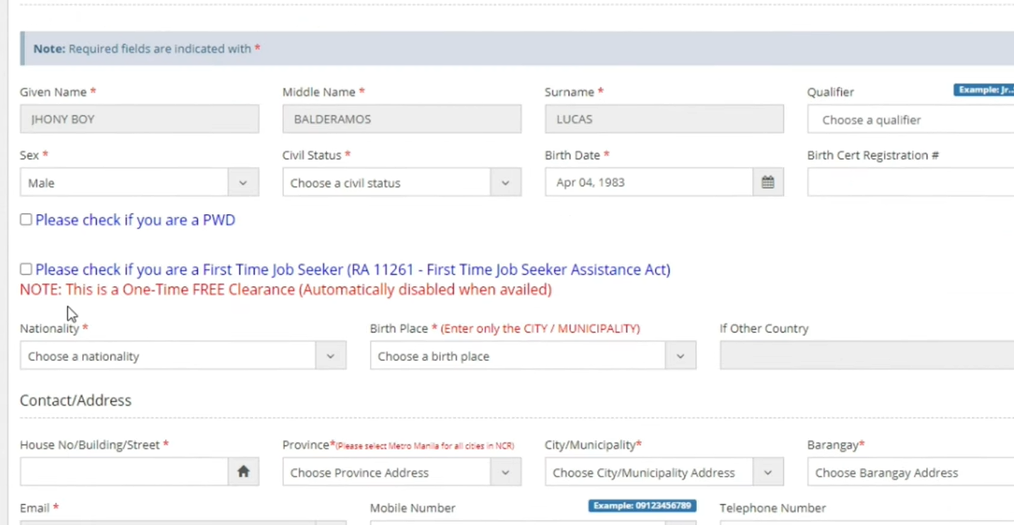
- Fill in your details:
- Full legal name (exactly as on your ID)
- Date of birth
- Email address
- Mobile number
- Gender
- Create a strong password you will remember.
- Click “Register” to submit.
- Check your email inbox (or Spam folder) for a verification email from NPCS.
- Click the verification link to activate your account.
Tip: Use an email address you will always have access to. You will receive appointment confirmations and important updates there.
Step 2: Complete Your Profile
You cannot book an appointment until your profile is 100% complete.
- Log in using your email and password
- Click “Edit Profile”
- Fill in all required fields:
- Height, weight, blood type
- Birthmarks or distinguishing features
- Spouse’s name (if applicable)
- Parents’ names — including mother’s maiden name (this is required)
- Upload a 2×2 ID photo with a white background:
- No glasses
- No hats or caps
- Face must be clearly visible
- A well-lit selfie against a white wall can work if properly cropped to a square
- Click “Save Profile”
Do not skip any field. Incomplete profiles will prevent you from proceeding to the booking step.
Step 3: Book Your Police Clearance Appointment
- From your dashboard, click “Clearance Application”
- Select “National Police Clearance” as the clearance type (not Local)
- Choose your preferred police station:
- You can choose any station in the Philippines — it does not have to be near your home
- If your nearest station is fully booked, try a nearby city’s station
- Select your appointment date — morning slots (8 AM – 10 AM) are recommended to avoid afternoon system slowdowns
- Choose your time slot (AM or PM)
- Review all details carefully
- Click “Next” to proceed to payment
After booking, your Appointment Reference Number will be generated. Screenshot or note this number — you will need it at the police station.
Step 4: Pay the Police Clearance Fee
After booking, you will be redirected to the Landbank of the Philippines (LBP) ePayment Portal for payment.

You do NOT need a Landbank account. The portal is just used as a payment processor.
Available Payment Methods:
- GCash (most popular and fastest)
- PayMaya / Maya
- BancNet (participating banks’ online banking)
- 7-Eleven CLiQQ Kiosk (cash payment)
- Bayad Center
- Landbank account (for LBP account holders)
How to Pay via GCash (Step-by-Step)
- On the LBP payment page, select “Cash Payment”
- A Payment Reference Number will appear on screen — SCREENSHOT IT IMMEDIATELY
- Open your GCash app
- Go to: Bills Payment → Government
- Search for “National Police Clearance” or “Landbank”
- Enter the Reference Number and the exact amount
- Complete the payment
- Go back to your browser and wait for the status to update from “Pending” → “Paid”
- Download and save your payment receipt
How to Pay via 7-Eleven CLiQQ
- Select “Cash Payment” → “7-Eleven”
- Save your Reference Number
- Go to any 7-Eleven with a CLiQQ Kiosk
- Go to: Bills Payment → Government → National Police Clearance
- Enter the Reference Number and pay at the counter
- Keep the receipt
What If Payment Status Stays “Pending”?
Do NOT pay a second time.
This is a common mistake that costs people extra money. Instead:
- Save your GCash receipt or 7-Eleven slip as proof
- Bring this proof to the police station on your appointment day
- The officer can use a “Verify Payment” tool to manually confirm your payment
Important: Make sure you pay at least two banking working days before your appointment. If payment is not credited in time, your appointment will be automatically cancelled and you will need to rebook.
Step 5: Visit the Police Station on Your Appointment Day
On the day of your appointment, go to the police station you selected during booking.
What to Bring:
- Your Appointment Reference Number (printed or on your phone)
- Proof of payment (official receipt, GCash screenshot, or printed receipt)
- Two valid government-issued IDs (originals only)
- A black pen (handy for any forms you might need to fill)
Dress Code (Strictly Enforced):
Police stations are formal government offices. Security guards will turn away anyone who is not dressed appropriately — even if you have a confirmed appointment.
| Allowed | NOT Allowed |
|---|---|
| Jeans and trousers | Shorts |
| Polo shirts | Sleeveless shirts (sando) |
| T-shirts with sleeves | Ripped clothing |
| Closed shoes | Slippers / flip-flops |
Arrive at least 15 minutes early to avoid problems.
What Happens Inside:
- Check-in: Present your reference number at the counter
- Photo: A fresh digital photo will be taken (remove glasses and heavy accessories)
- Fingerprints: All fingers are digitally scanned
- Signature: Sign on an electronic pad
After biometrics, your information goes through a real-time check in the PNP national database.
Step 6: Receive Your National Police Clearance Certificate
What happens next depends on your database check result:
“No Hit” — Clean Record ✅
- The system finds no match for your name in the criminal database
- Your clearance certificate is printed and handed to you within 15–30 minutes
- You are done — walk out with your clearance
“With Hit” — Name Match Found ⚠️
- The system flagged a possible name match in the database
- This does NOT automatically mean you have a criminal record
- Common names like “Juan Dela Cruz” match many people, including some with records
- What happens next:
- Your clearance is temporarily withheld
- Status changes to “For Verification”
- The PNP verification unit checks if the record actually belongs to you
- This process takes 5 to 15 working days
- You may need to provide an Affidavit of Denial if the system is unsure
- If it is a “namesake” situation (not you), you will get your clearance once verified
How Long Does Processing Take?
| Situation | Processing Time |
|---|---|
| Online registration and booking | 10–15 minutes |
| Station visit (biometrics) | 10–20 minutes |
| No Hit — clearance release | Same day (15–30 minutes after biometrics) |
| With Hit — verification period | 5–15 working days |
| Walk-in application (no online booking) | 30 minutes – 1 hour |
How to Verify a National Police Clearance Certificate
Anyone can verify a National Police Clearance certificate online for free. This protects against fake documents.
How to verify:
- Go to the official NPCS portal: http://policeclearanceinfo.ph/
- Click “Verify Clearance”
- Enter the applicant’s surname (exactly as on the certificate)
- Enter the clearance number (printed on the certificate)
- Complete the CAPTCHA
- Click “Verify”
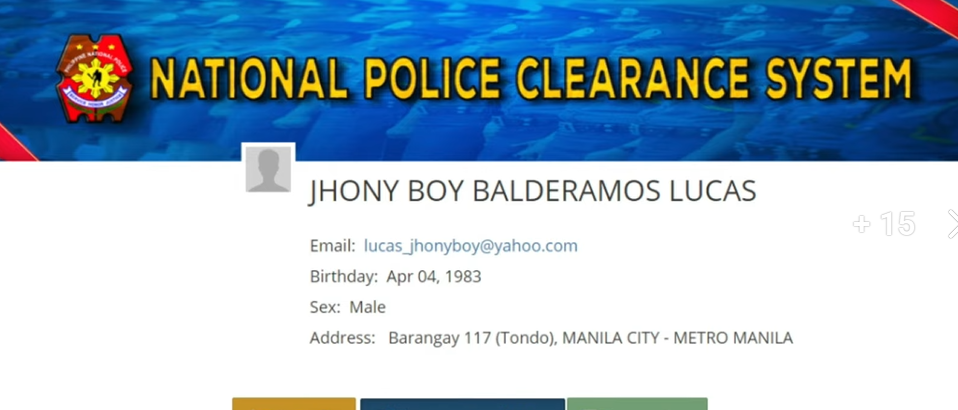
The system will show the clearance status (valid or invalid), the photo, and the date of issuance.
Employers now routinely do this check. If you buy a fake clearance from a “fixer,” it will fail this verification instantly — and you could face legal consequences.
Verification is completely free. No login needed to verify someone else’s clearance.
National Police Clearance Validity and Renewal
Your National Police Clearance is valid for 6 months from the date it was issued.
After 6 months, it expires and will no longer be accepted. There is no separate renewal process — you simply apply again from the beginning:
- Log back into your NPCS account
- Book a new appointment
- Pay the fee again
- Visit the police station for biometrics
- Receive your new clearance
You can apply for a renewal before your current clearance expires if you know you will need it soon.
Why does it expire after 6 months?
- Criminal records are updated regularly
- A short validity ensures your background check is always current and accurate
- Institutions trust it more because it reflects recent information
Special Cases: Police Clearance Without Personal Appearance
Most people must visit the police station in person. However, the PNP allows certain applicants to complete the process without appearing in person:
- Overseas Filipino Workers (OFWs) — Apply online; clearance can be downloaded or delivered
- Bedridden or seriously ill individuals — With supporting medical documents
- Applicants on probation or bail — With proper legal documents
- Deceased persons — Family members can request through proper legal channels
For OFWs specifically:
- Register and complete your profile online
- Upload scanned copies of your documents (passport bio page, visa, immigration stamps, proof of residency abroad)
- Schedule an overseas application
- Pay online
- Download your clearance or have it delivered to your address
You can also visit the nearest Philippine embassy or consulate to apply in person from abroad.
Types of Police Clearance in the Philippines
There are four main types of clearances you might encounter:
1. National Police Clearance (NPC)
- Issued by the PNP via the NPCS system
- Valid nationwide
- Best for: employment, government transactions, bank requirements, gun license
- Valid for 6 months
2. Local Police Clearance (LPC)
- Issued by local police stations
- Valid only within the local jurisdiction
- Best for: local jobs, local business permits, community-related purposes
- Walk-in application (some stations offer online services)
- Valid for 6 months
3. Barangay Clearance
- Issued by Barangay Hall officials
- Confirms your residency and good standing in the community
- Often required before applying for police clearance
- Not processed through NPCS — go directly to your barangay hall
4. Police Clearance for Overseas Filipinos (PCC-OE)
- Issued by the PNP for Filipinos working or living abroad
- Accepted internationally for visa and overseas employment
Important Tips and Warnings
Tips for a Smooth Application
- Double-check your name spelling before submitting registration. Even one wrong letter causes problems.
- Screenshot your Reference Number and payment receipt right away. Do not close the browser before saving them.
- Bring ALL required documents on appointment day. Going back a second time wastes your time and money.
- Arrive 15 minutes early at the police station to avoid missing your slot.
- Follow the dress code. Security will not allow entry if you are wearing slippers, shorts, or sleeveless clothing.
- Book morning slots (8–10 AM) when the system is most stable and station lines are shorter.
Warnings to Keep in Mind
- Do NOT use fake or expired IDs. Your application will be rejected on the spot.
- Do NOT pay twice if your status shows “Pending.” Just bring proof of payment to the station.
- Do NOT engage fixers. Ads claiming “non-appearance” police clearance services are scams. There is no biometric bypass. Fake documents fail QR code verification and can lead to blacklisting or criminal charges.
- Do NOT use a third-party website to apply. Only use the official NPCS portal at official sites harvest your personal data.
- Do NOT let your appointment lapse. If you miss your scheduled date, you have 15 days to still visit the station and complete the process. After 15 days, your payment is forfeited and you must apply again.
- Personal information cannot be edited after your clearance is printed. If there is an error, you must submit a new application and pay again.
Frequently Asked Questions (FAQs)
How do I get a National Police Clearance online?
Go to http://policeclearanceinfo.ph/, register an account, complete your profile, book an appointment at any police station, pay the ₱150 fee online, then visit the station on your appointment day for biometrics. Your clearance is released the same day if you have no “hit.”
How much does a National Police Clearance cost?
The base fee is ₱150. An additional transaction fee of ₱10 to ₱30 applies depending on your payment method. Total is approximately ₱160 to ₱180. First-time job seekers can get it for free with a Barangay Certificate.
How long is a National Police Clearance valid?
It is valid for 6 months from the date of issue. After that, you must apply for a new one.
Can I get a police clearance without going to the police station?
Generally, no. The biometric step (fingerprints, photo, signature) requires a personal appearance. However, exceptions exist for OFWs, bedridden individuals, and other special cases as described above.
What happens if I have a “Hit”?
A “Hit” means the system found a name in the database similar to yours. It does NOT mean you have a criminal record. The PNP verification unit will check the record to see if it belongs to you. This takes 5 to 15 working days. You may need to submit an Affidavit of Denial.
Can I choose any police station for my appointment?
Yes. You can book at any police station across the Philippines. It does not have to be in your city or municipality. If your preferred station is fully booked, choose a nearby one.
What if I missed my appointment?
You have 15 days from your original appointment date to visit the police station and still complete the process. If you go beyond 15 days, your payment is forfeited and you must reapply.
Can walk-in applicants still apply?
Walk-in applications are generally not accepted for National Police Clearance. The NPCS requires an online appointment first. Some local stations may still accept walk-ins for Local Police Clearance — but this depends on that station’s policy.
Is the National Police Clearance accepted for visa applications?
It is accepted for some visa applications, especially for local or domestic purposes. For international or overseas immigration requirements, an NBI Clearance is usually required instead. Check with the embassy or agency you are applying to.
How do I verify if a police clearance is real?
Go to http://policeclearanceinfo.ph/, click “Verify Clearance”, enter the surname and clearance number, and click Verify. The system will confirm if the document is authentic. This service is free.
Contact and Support
If you have questions or problems with your application, contact the NPCS directly:
NPCS One-Stop Shop Office
- 📍 Camp Crame, Quezon City, Philippines
- 📞 (02) 8723-0401 loc. 7663
Online Support
- 🌐 Official Website: http://policeclearanceinfo.ph/
- 📧 Email: [email protected]
- 🚨 PNP General Hotline: 117 or 911
Office hours are Monday to Friday, 8:00 AM to 5:00 PM. Some stations are open Saturday mornings — check with your chosen station.
Final Checklist Before You Apply
Use this checklist to make sure you are ready before starting your application:
Before Registration:
- [ ] Active email address ready (Gmail or Yahoo)
- [ ] Active mobile number ready
- [ ] Two valid original IDs prepared
- [ ] Name spelling confirmed — matches your ID exactly
Before Your Appointment:
- [ ] Reference number saved (screenshot or note)
- [ ] Payment receipt saved
- [ ] Both valid IDs in your bag
- [ ] Dress code followed (no slippers, shorts, or sleeveless tops)
- [ ] Arriving 15 minutes early
At the Police Station:
- [ ] Present reference number at counter
- [ ] Submit to biometrics (photo, fingerprints, signature)
- [ ] Wait for name to be called
- [ ] Check the printed clearance for errors before leaving
Conclusion
Getting a National Police Clearance in the Philippines in 2026 is much simpler than it used to be. The National Police Clearance System (NPCS) has moved almost everything online — from registration to payment to appointment booking. You only need to go to the police station once, and the whole visit usually takes less than 30 minutes if you have a clean record.
The key to a smooth experience is preparation. Make sure your name matches your ID exactly, complete your profile before booking, pay on time, and bring all your documents on appointment day. Follow the dress code, arrive early, and cooperate with the officers.
Disclaimer: This article is for informational and educational purposes only. We are not affiliated with the Philippine National Police (PNP) or any government agency. For official services, please visit the NPCS portal at https://pnpclearance.ph.